Bare Shaft Tuning: A Beginner's Guide
Shoot a few unfletched shafts alongside your normal arrows and you can see straight away whether your nocking point and your spine are right. Here is how to read the impacts, and which way to move things, based on Easton's tuning guide.
Updated August 29, 2026

Bare shaft tuning gives you more information than any other check you can run without buying a single extra piece of kit. Take a shaft with no fletching on it, shoot it alongside your usual arrows, and that alone tells you about your nocking point height and whether your spine is right.
The procedure itself is short, and even a first-timer can work through the whole thing in an afternoon. The hard part is reading the impacts, and if you get that backwards, every adjustment you make will move you further from a tune.
The steps and the diagnoses in this article follow the Bare Shaft Planing Test as set out in Easton’s Arrow Tuning and Maintenance Guide (PDF). That guide is a primary source published by an arrow manufacturer, and it is one of the most widely cited documents in the field. Throughout, we keep what the guide says separate from our own editorial commentary.
What the test actually shows
An arrow flexes the instant it leaves the string. Even when it looks like it is flying straight, it is oscillating vertically or horizontally as it comes off the bow. That oscillation falls into two categories.
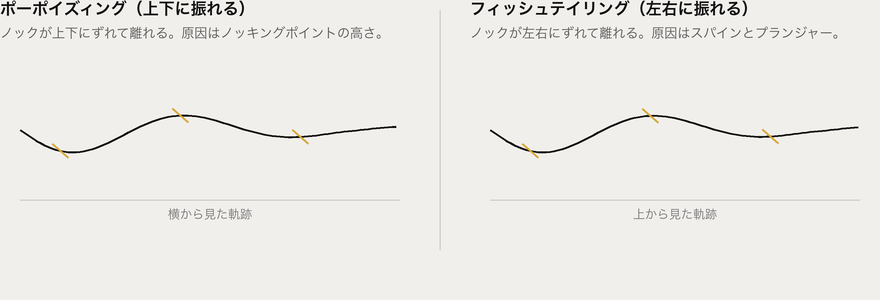 The guide calls the first porpoising and the second fishtailing. They have different causes, so they have different fixes.
Fletching — vanes or feathers — uses air resistance to force the shaft back into line. In other words, it hides the errors in your arrow’s launch. The more effective the fletching, the more it hides.
Take the fletching off and that correction disappears. Whatever pushed the arrow at the moment of launch is still there in the impact point. That is why a bare shaft’s impact is a record of “which way the arrow was pushed as it left the bow.”
A fletched arrow can land in the middle simply because the fletching absorbed the error. Mixing in bare shafts shows you the picture before that correction happens.
The procedure
The guide specifies these conditions.
| Item | What the guide specifies |
|---|---|
| Distance | 15 to 20 yards (or meters) |
| Fletched shafts | At least three |
| Bare shafts | Two |
| Aim | Identical to the fletched shafts (identically-aimed) |
Shoot three fletched shafts first, then two bare shafts, at exactly the same aiming point. If you change your aim the comparison is worthless, so be strict about this.
Where the nocking point should start
The guide also tells you where the nocking point should be before you begin the test: 1/2 inch (1.3 cm) above square — square meaning perpendicular to the string — as the starting position for a recurve finger release (RF).
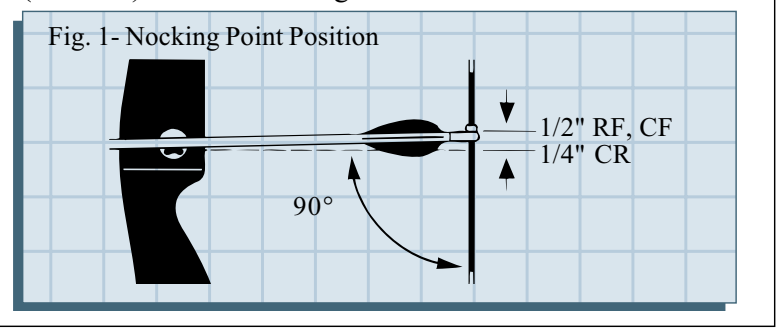
Source: Easton Technical Products, "Arrow Tuning and Maintenance Guide," p.1 (PDF, retrieved 14 August 2026)
Start there and move it up or down according to what the test tells you. If you start moving it without knowing where you are, you will get lost.
The guide also notes that once you have the bare shafts landing close to the fletched arrows, you can back up to 25–30 yards (or meters) for a finer tuning indication.
Editor’s note: treat one round as a single data point and repeat it at least three times. Bare shafts pick up the archer’s own variation as well, so a single outlier can drag the center of the group a long way. What you are judging is not any individual arrow but the center of the accumulated group.
Fix vertical first
The guide is explicit: “It is important to correct for Porpoising first.” If you chase the horizontal while the vertical is still off, the two interfere with each other and you will never converge.
The guide illustrates the condition.
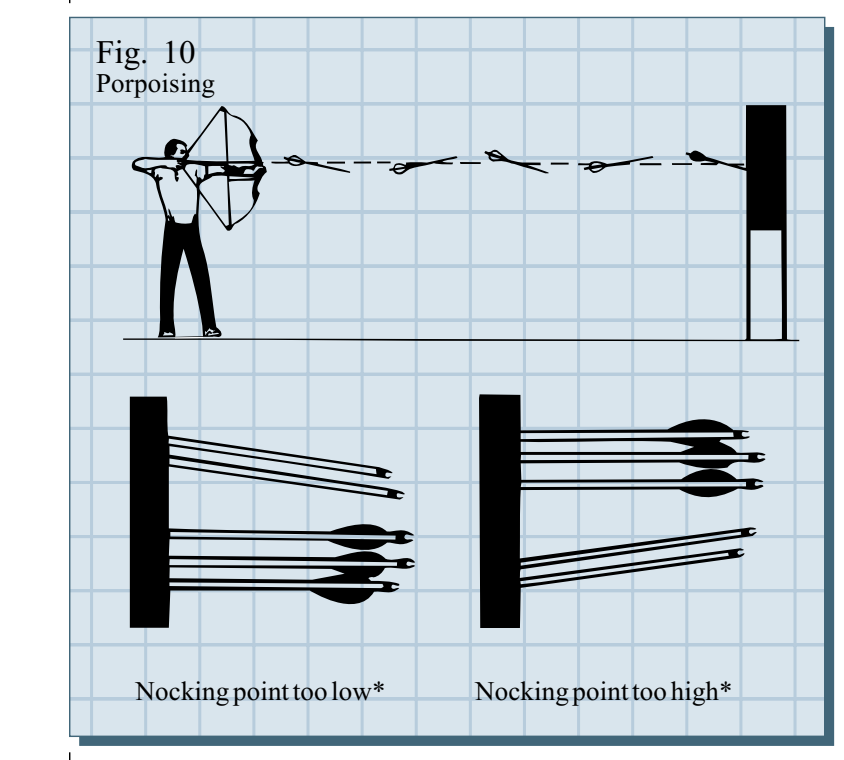
Source: Easton Technical Products, "Arrow Tuning and Maintenance Guide," p.5 (PDF, retrieved 14 August 2026)
On the left of the figure, where the nocking point is low, the unfletched shafts (top row) group above the fletched ones (bottom row). Put that relationship into a diagnostic table and it looks like this.
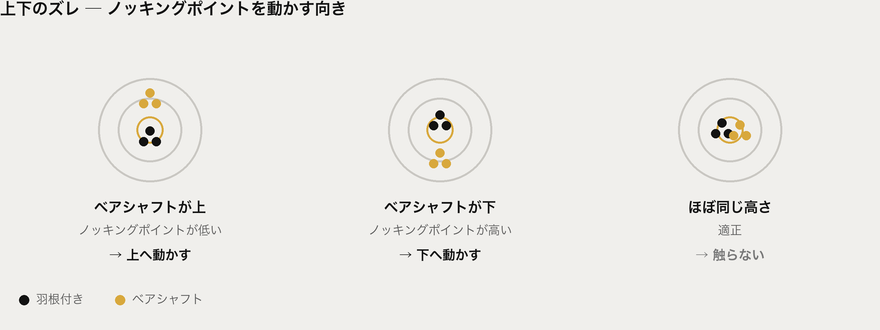 If the bare shafts land high, move the nocking point up. If they land low, move it down.
- Bare shafts land above the fletched shafts → move the nocking point up
- Bare shafts land below the fletched shafts → move the nocking point down
This is the part that feels backwards. It is not “it is flying high, so lower it.” A bare shaft landing high is telling you the nocking point is too low.
Why? The nock is the back of the arrow. Drop the back and the arrow tilts nose-up, and an arrow that launches nose-up goes high. That is all there is to it.
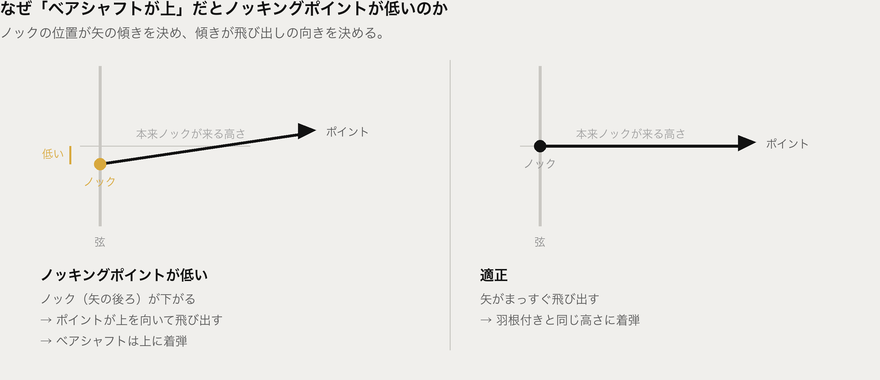 The nock is the rear end of the arrow. The lower it sits, the more the point is aimed upward.
The guide gives a second reason. If the nocking point is too low, “it may force the arrow fletching down into the arrow rest, creating Clearance problems.” A vertical error drags other faults in with it.
There is also a caveat: it is sometimes desirable to have the bare shaft impact just slightly below the identically-aimed fletched shafts. A dead-on match is not the only correct answer.
Left and right: spine and plunger
Once the vertical is settled, look at the horizontal. Everything below assumes a right-handed archer; reverse left and right if you shoot left-handed.
The guide’s figure shows the two ways the impacts can split on the target face.
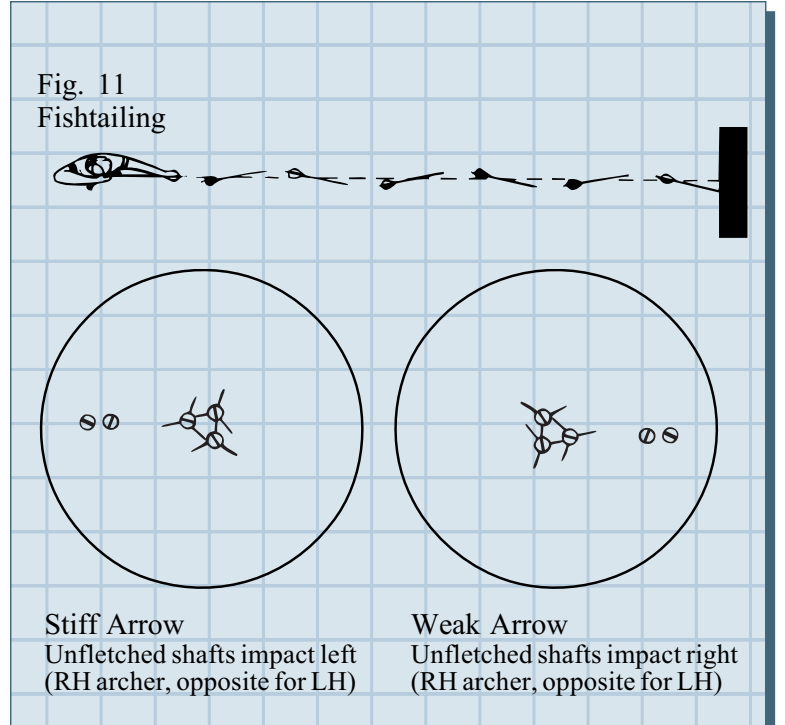
Source: Easton Technical Products, "Arrow Tuning and Maintenance Guide," p.6 (PDF, retrieved 14 August 2026)
Here is the same thing with the fixes attached.
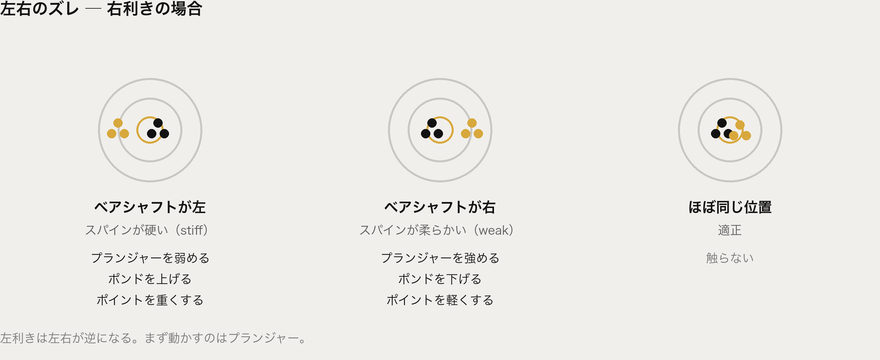
- Bare shafts land left (stiff) → decrease the cushion plunger spring tension / increase bow weight slightly / increase arrow point weight
- Bare shafts land right (weak) → increase the cushion plunger spring tension / decrease bow weight slightly / decrease arrow point weight
The three fixes are all doing the same job: each of them moves the effective stiffness of the arrow. Stiffness is not set by the shaft’s model number alone. It is the result of the shaft, your draw weight, your point weight and your plunger tension taken together.
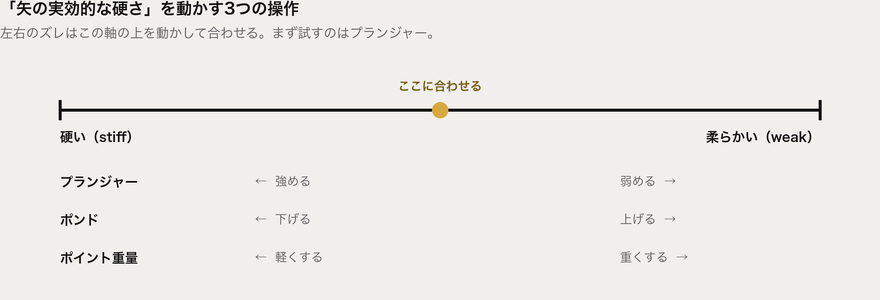 The same shaft sits at a different stiffness depending on these three adjustments.
Start with the plunger and see whether you can absorb the error there before you touch the bow or the arrows. Bow weight and point weight affect other things too — speed, sight marks, the load on your body — so they come later in the order.
On adjustment increments, the guide specifies 1/8 of a turn at a time for a recurve finger release (RF). Change it, shoot again, and if the group gets worse, go back to the original setting and work in the opposite direction. Turn it a long way in one go and you will have no idea which change did what.
If you run out of plunger travel and the offset is still there, the shaft’s spine itself is wrong for you. The guide says the same thing: if the left/right adjustments do not bring the unfletched shafts in with the fletched ones, a weaker or stiffer spined shaft must be selected.
How close is close enough?
The guide puts a number on it.
If, after completing this test, the bare shaft impact is more than 6 inches (15 cm) to the right (weak) or left (stiff) of the fletched shafts at 20 yards (18 m), you will need to make some modifications to the equipment to achieve a better tune.
Read the other way round: if you are inside 6 inches, you are within the range that small adjustments such as the plunger can close. Judge against that distance rather than against a vague sense that the arrows are “roughly together.”
The guide is also clear that you should not be chasing a perfect match.
It is common on a well-tuned bow to have the bare shaft impact a little low and slightly stiff (to the left of the fletched shafts for a right-handed archer). Occasionally, a good tune may be achieved with the bare shaft impacting slightly weak (to the right of the fletched shafts for right-handed archers), but this is less common.
So what you are aiming for is not perfect overlap but slightly low and slightly left for a right-handed archer. Not knowing that is how archers take a bow that is already tuned and adjust it until it is not.
A matched bare shaft does not guarantee good groups
This is the most widely misunderstood point in the whole process, so here it is in the guide’s own words.
Having a perfect bullet hole through paper using the Paper Tuning Arrow Test, or having the bare shafts impact exactly with the fletched shafts using the Bare Shaft Planing Test, does not always mean your arrows will group well; it only indicates you have good arrow flight.
On that basis, the guide provides separate procedures — Fine Tuning and Micro Tuning — for tightening the groups themselves.
Bare shaft tuning is a starting point, not a finish line. You cannot move on until it is right, but getting it right is no guarantee that your score will go up. Related to this, the guide lists the following combinations.
| Arrow flight | Grouping | What the guide says |
|---|---|---|
| Poor | Good | Commonly the result of a stiff arrow. The arrow yaws slightly as it leaves the bow but usually recovers quickly, so the grouping is often acceptable |
| Good | Poor | It seems contradictory, but it is fairly common. Good flight and tight groups are two different things |
| Poor | Poor | Most often mismatched arrow spine, or equipment that simply has not been tuned |
Group patterns point to the cause
So when the groups are bad, what do you look at next? The guide shows how to narrow down the cause from how the group size changes with distance.
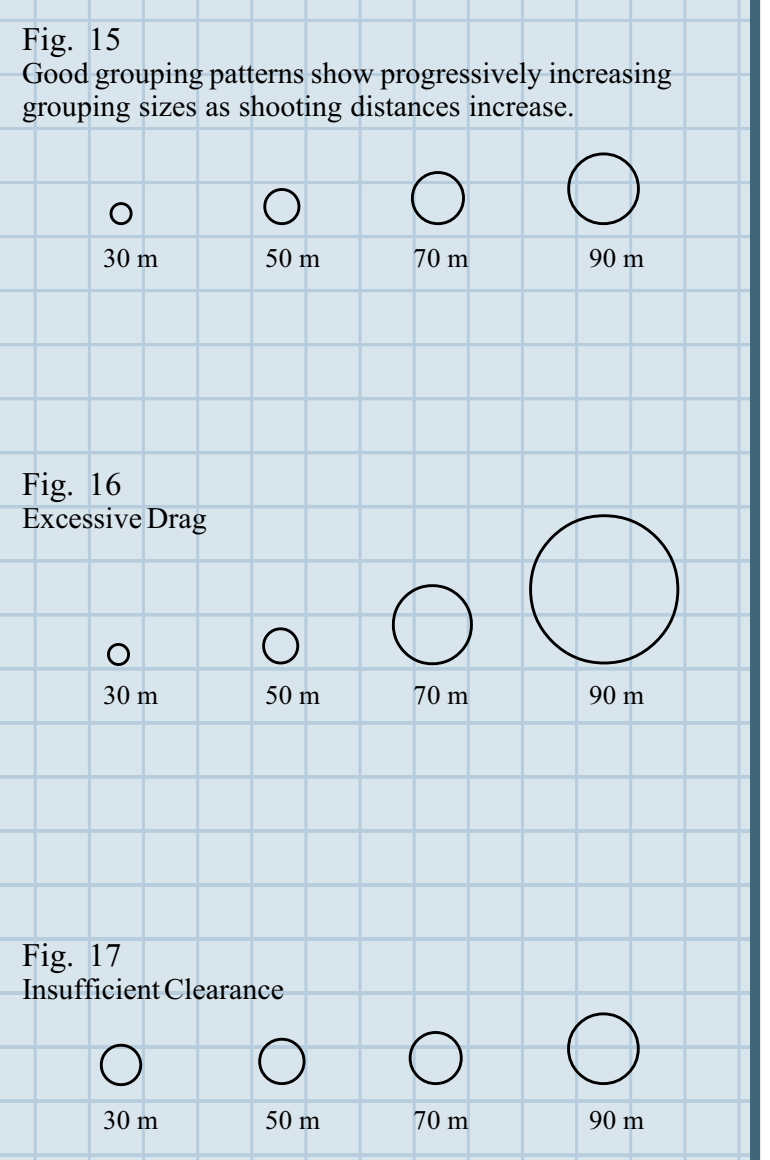
Source: Easton Technical Products, "Arrow Tuning and Maintenance Guide," p.9 (PDF, retrieved 14 August 2026)
Here is how to read them.
- Fig. 15 (good) — the group grows in proportion as the distance increases. That is the healthy pattern
- Fig. 16 (excessive drag) — acceptable up close, but disproportionately large at long distance. Forward velocity is decaying too quickly and the flight becomes unstable. Reduce drag by making the fletching smaller (in height and/or length), reducing its angle, or both
- Fig. 17 (insufficient clearance) — the long-distance groups are within acceptable limits, but the short-distance groups do not shrink in proportion. Something is contacting the arrow as it passes the bow
In other words, “it scatters at 70 m” and “it scatters at 18 m” are different problems. Without looking at which distance falls apart, you cannot isolate the cause.
When not to do this test
From here on this is our own judgement, not something set out in the guide.
Do not do it while your form is still unsettled. A bare shaft amplifies every inconsistency in your release. If your release changes from day to day, what you are measuring is your own variation, not your equipment. Buying a new set of arrows on the strength of that is the most expensive mistake in this whole process.
Do not do it on a windy day either. An unfletched shaft catches the wind differently from a fletched one. Outdoors, pick a still day; indoors is better if you have the option.
Do not draw conclusions from a single round. It bears repeating, because it is the most common failure.
Summary
- A bare shaft shows you what the arrow is doing before the fletching hides it
- Shoot three fletched shafts, then two bare shafts, at 15–20 yards (or meters) with an identical aim. We suggest at least three rounds
- Fix the vertical (nocking point) first and the horizontal (spine and plunger) second
- For the vertical, “bare shaft high means nocking point up.” This is the part that feels backwards
- For the horizontal, right-handed: left = stiff, right = weak. Start with the plunger, 1/8 of a turn at a time
- More than 6 inches (15 cm) left or right at 20 yards (18 m) means you need to change equipment. Aim for slightly low and slightly left, not a perfect match
- A matched bare shaft does not mean tighter groups. This is a starting point, not a finish line
Sources and quotations
The procedures and diagnostic criteria in this article are based on the Bare Shaft Planing Test as described in the Arrow Tuning and Maintenance Guide (PDF, retrieved 14 August 2026) published by Easton Technical Products. Fig. 1 (p.1), Fig. 10 (p.5), Fig. 11 (p.6) and Figs. 15–17 (p.9) from that guide are reproduced unaltered for the purpose of explanation. Copyright in those figures belongs to Easton Technical Products.
All other diagrams were produced by this site. Passages written as our own editorial commentary are marked as such in the text.